6 Apr 2021

Power BI : Transform Data into different Format using M-Query with NO LIMITATION on number of Data rows

Hello Folks!!

As a matter of fact and promised in previous post  Power BI : Transform Data into different Format using M-Query with same number of Data rows, this time I comes with an extension of the previous post where we have discussed on how to manage or transfer one format of data into another under the umbrella of Power BI (Post name is mentioned above), this post will even go further and follow no boundaries on the number of rows data has after Header row, i.e. this will overshadow the restriction of number of rows as mentioned in previous post.

As technology grows and time demands, any restriction or limitation in any kind of technology will always degrade the fame of the technology, hence Microsoft too support on NO LIMIT policy, at least this is true in that case.

Sounds quite Interesting !! Indeed ! Let's explore the world of no limitation under the scope of Power BI with the help of our very own example illustrated in previous post.

Let's start the road roller with some illustration.

Requirement :

We have source file which is placed at any location does contains data that is not ideal for Power BI to render with, instead we have very absurd way of formatted data as detailed further, i.e. the very first row having information of the header, i.e. DATA, CLOUD and AZURE and there after, there are rows that contains rows that belongs to subsequent header, i.e. data is like we have Header and then their subsequent rows, then header and its subsequent rows and we do not have any limitation on number of rows to be available for every head, it can be any number as contrast to previous post where number of rows for each header must be same, now, requirement is to load the data into Power BI dataset which can be easily understood by Power BI and reports can be created based on this Power BI Dataset.

Resolution : 

Again to proceed any further, we need to understand the source file, here by I am going to explain source file which will help us to understand what actually is required and what exact transformation and logics we are in need to create.

Just to begin with, let's say very first rows of the source file (termed as TABLE A) contains row as "ColA, ColB and ColC, and then onwards, it contains rows that consists of string having text as DATA for all the columns, post that, there are any number of rows of data beneath header DATA row which means all these corresponding rows belongs to DATA only, in a same manner, we have another set of one row that having string value as  "CLOUD followed by number of rows that are belongs to CLOUD and so on for rest of the data, i.e. we have AZURE header followed by their subsequent rows with any number of data rows.

Aforementioned detail of Source file elaborated very much detail of the source data, now its right time to explore on how to transform this source file data format into the format which is easily readable by Power BI and processed in the further Reports.


In order to transform data of source file into the format which Power BI can understand, we need to perform transformation as shown in below image, i.e. Table A to Table B where Table B is the new transformed format and which is easily readable by Power BI.

Obviously, this is not something which can be achieved easily and not a straight forward at all, instead we need to apply few tricks to achieve the goal, who can be better friend in such situation other than M-Query, so let's see how M-Query will helps us to get rid of such bad format of the data and to convert into format that will be easily readable by Power BI.           


i.e. all the header data now come under one umbrella i.e. under one column, lets say name of the column is Type and rest will go under specific column as previous i.e. ColA, ColB and ColC.

Let's see how we can transform the file with  the help of M-Query of Power BI, illustrated and detailed in below mentioned steps.

Note - For Demo purpose, I have created Data shown in Table A via using ENTER DATA.

Step 1 : Open Power BI Desktop

Step 2 : Navigate ribbon to the Home and Click on Get Data

Step 3 : Under Get Data, search for Blank Query

Step 4 : On opened Blank Query, paste the below mentioned M-Query and provide meaningful name such as Dimension and click on OK, this will create a table named Dimension which can be further use in the Dataset.

* Below is the M-Query for the Function : Dimension

Table : Dimension

let
    Source = YOUR SOURCE EXCEL,
    #"Changed Type" = Table.TransformColumnTypes(Source,{{"ColA", type text}, {"ColB", type text}, {"ColC", type text}}),
     #"Added Custom" = Table.AddColumn(#"Changed Type", "Type", each if ([ColA]=[ColB]) and ([ColB]=[ColC])  then 1 else 0),
         #"Added Index" = Table.AddIndexColumn(#"Added Custom", "Index", 1, 1, Int64.Type),
    #"Added Custom1" = Table.AddColumn(#"Added Index", "Custom", each List.Sum(
    List.FirstN(
        #"Added Index"[Type],
        [Index]
    )
)),
    #"Changed Type1" = Table.TransformColumnTypes(#"Added Custom1",{{"Custom", Int64.Type}}),
    #"Filtered Rows" = Table.SelectRows(#"Changed Type1", each ([Type] = 1)),
    #"Removed Other Columns" = Table.SelectColumns(#"Filtered Rows",{"ColB", "Custom"}),
    #"Renamed Columns" = Table.RenameColumns(#"Removed Other Columns",{{"Custom", "RunningValue"}})
in
    #"Renamed Columns"

* Above M-Query will create the Dimension table  that having all the values of Header (DATA, CLOUD and AZURE) under one umbrella, i.e. one column will contain all the values of the Header.

* This table is intermediate table and will be used for look up and merging of data further.

* Data in the Dimension table will look like as mentioned below


* Just to synchronise with the project you work, please replace Source < Source = YOUR SOURCE EXCEL>  with your source path  in a code above.

Step 5 : Navigate ribbon to the Home and Click on Get Data

Step 6 : Under Get Data, search for Blank Query

Step 7 : On opened Blank Query, paste the below mentioned M-Query and provide meaningful name such as "MyData" and click on OK, this will create MyData table in Power BI platform and scope is limited to the complete report level.

M Query for Table :  MyData 


let
    Source = YOUR SOURCE EXCEL,
#"Changed Type" = Table.TransformColumnTypes(Source,{{"ColA", type text}, {"ColB", type text}, {"ColC", type text}}), #"Added Custom" = Table.AddColumn(#"Changed Type", "Type", each if ([ColA]=[ColB]) and ([ColB]=[ColC]) then 1 else 0), #"Added Index" = Table.AddIndexColumn(#"Added Custom", "Index", 1, 1, Int64.Type), #"Added Custom1" = Table.AddColumn(#"Added Index", "Custom", each List.Sum( List.FirstN( #"Added Index"[Type], [Index] ) )), #"Changed Type1" = Table.TransformColumnTypes(#"Added Custom1",{{"Custom", Int64.Type}}), #"Renamed Columns" = Table.RenameColumns(#"Changed Type1",{{"Custom", "RunningValue"}}), #"Merged Queries" = Table.NestedJoin(#"Renamed Columns", {"RunningValue"}, Dimension, {"RunningValue"}, "Dimension", JoinKind.LeftOuter), #"Expanded Dimension" = Table.ExpandTableColumn(#"Merged Queries", "Dimension", {"ColB"}, {"ColB.1"}), #"Renamed Columns1" = Table.RenameColumns(#"Expanded Dimension",{{"ColB.1", "Type Name"}}), #"Merged Queries1" = Table.NestedJoin(#"Renamed Columns1", {"ColB"}, Dimension, {"ColB"}, "Dimension", JoinKind.LeftAnti), #"Removed Other Columns" = Table.SelectColumns(#"Merged Queries1",{"ColA", "ColB", "ColC", "Type Name"}) in #"Removed Other Columns"

* Please replace Source < Source = YOUR SOURCE EXCEL with your source path  in a code above.

Step - 8 Click OK.

Hurray !!! Here we go, we got the desired result.  

                                                            
As its a nature of world, everything good things comes with some sort of exception as well, this too is also not exception, please check below for the same.

Pros : 
1. This will change the complex format of the data into very easy and readable format which Power BI can read easily and process in Reports.

2. No external tool intervention is required to change the format of the data. M-Query does all the magic.

Cons :
1. Some time, it take more time to execute and needs good understanding of the M-Query.

Author - Feel free to ask query if you have any query


25 Mar 2021

Power BI : Transform Data into different Format using M-Query with same number of Data rows

Hello Folks!!

This time I came up with some tricks related to the transformation of one format of data into another via M-Query that will be readable friendly with Power BI.

Few day back, I was working with Power BI Desktop in one of the important report of my Day-In Day-Out work and encounter a very interesting piece of work to deal with, there in, data is available in one of the source file lets say EXCEL or CSV  and data is not amicable with Power BI, i.e. Power BI may not be able to render this piece of data with such available format correctly, data could be like the way it is shown in the snapshot below, termed it as table A.                            


Basically, I am going to elaborate here very practical scenario where we need to transform data of one table which having huge data into somewhat readable format by Power BI, but as a pre-requisite, there must be some symmetry in terms of data availability in source big table, and here symmetry is that we have fixed number of data rows after every Data Head.

Let's start the road roller with some illustration.

Requirement :

As stated above as well, we have one source file where data is not available as normal as available in tabular data, instead, we have one row that having information of header, for e.g. DATA, CLOUD and AZURE and there after, there are rows corresponding to particular head, as one can see there is always a two rows for every head (here in this post, I am only dealing with the scenario where number of rows for each head is same, as in this scenario we have two rows for each DATA, CLOUD and AZURE), now we need to load this data into Power BI Dataset which can be easily read by Power BI and report will be build on that set of the data.

Resolution : 


First of all, let me explain the source file so that it will be easy to understand what need to be done and what exact transformation we needed to create.


To start with , source file (termed as TABLE A) contains very first row as "ColA, ColB and ColC, and then after rows contains string text of DATA for all the columns, and there after, there are two rows of data beneath data row which means these two rows belongs to DATA only, similarly, we have next two where all columns having string Text as "CLOUD: and beneath it, we have two more rows, again it means it belongs to CLOUD only, and then onward we have similar set of data for another heads such as "AZURE", here number of heads can be any but number of data rows for each head must be 2 as in this case, however, it can 3 or 4 or any, but limitation here is, there must be same number of rows for each head.

Till here, we talked a lot about the source file, how and what type of data it contains, now its time to elaborate on how source file need to transform into another layout which is very well understood by Power BI.

To transform the file into the format which Power BI can well understand, we need to transform the above file as shown as below, i.e. Table A to Table B where Table B is the new transformed format which Power BI can read and able to create report based on it. 


i.e. all the category data will come under one column, lets say name of the column is Source and rest will go under specific column as previous i.e. ColA, ColB and ColC.

Let's see how we can transform the file with  the help of M-Query of Power BI, illustrated and detailed in below mentioned steps.

Step 1 : Open Power BI Desktop

Step 2 : Navigate ribbon to the Home and Click on Get Data

Step 3 : Under Get Data, search for Blank Query

Step 4 : On opened Blank Query, paste the below mentioned M-Query and provide meaningful name such as TransformTable and click on OK, this will create  Function TransformTable in Power BI platform and scope is limited to the complete report level.

* Below is the M-Query for the Function : TransformTable

Function : TransformTable
(x) as table =>
let
    #"Save Header Name" = {x{0}[ColA]},
    #"Add New Column" = Table.AddColumn(x, "Source", each #"Save Header Name"{0} ),
    #"Removed Top Rows" = Table.Skip(#"Add New Column",1),
    #"Reordered Columns" = Table.ReorderColumns(#"Removed Top Rows",{"Source", "ColA", "ColB", "ColC"})
in    #"Reordered Columns"


* Below is the look and feel of the function TransformTable (in the Query Editor of Power BI) created.


Step 5 : Navigate ribbon to the Home and Click on Get Data

Step 6 : Under Get Data, search for Blank Query

Step 7 : On opened Blank Query, paste the below mentioned M-Query and provide meaningful name such as "MyData" and click on OK, this will create MyData table in Power BI platform and scope is limited to the complete report level.

M Query for Table :  MyData 
let
    Source = Table.FromRows(Json.Document(Binary.Decompress(Binary.FromText("i45WckksSVTSQaFidaKVfHQNgVwjIDaG8kFsUyA2A/Odc/JLU4A8VBqi0hjItwBiSyjfBMg2BBlnaAQWcawqLUoFclFpiFqQDYZgDaZQETMQxxxEWCjFxgIA", BinaryEncoding.Base64), Compression.Deflate)), let _t = ((type nullable text) meta [Serialized.Text = true]) in type table [ColA = _t, ColB = _t, ColC = _t]),
    #"Changed Type" = Table.TransformColumnTypes(Source,{{"ColA", type text}, {"ColB", type text}, {"ColC", type text}}),
    #"Split Tables" = Table.Split( #"Changed Type", 3 ),
    #"Transform Table" = List.Transform(#"Split Tables", TransformTable),
    #"Load Table" = Table.Combine( #"Transform Table" )
in
    #"Load Table"


* Highlighted Yellow - Highlighted section referring to the source for the table, please replace this highlighted section with the your source of code.

* Highlighted (RED)  - This section of code will split table into number of rows, i.e. "3" here will define as with how many number of rows of data does table split with. for e.g. here say for DATA we have three rows, two data row and one DATA row itself and so on for the rest of the data, below is the output of the transformed data


* So, if the number of rows are say 5 including Category for one Category, then 3 in a code will be replaced by 5.

Step 8 : Click on OK. 

Once OK was clicked, data will get refreshed and look like as below. 

Hurray !!! Here we go, we got the desired result.


As rule of thumb everything in this world having pros and cons, this is also not exception, please check below for the same.

Pros : 
1. Transformed data is easy to understand and successfully got processed in Power BI.

2. No external tool is required to change the format of the data. M-Query does all the magic.

Cons :
1. Number of columns must be fixed.

2.  Number of data rows for every heads must be same, for e.g. here, there are two rows for each DATA, CLOUD and AZURE etc category.

Author - Feel free to ask query if you have any query

22 Sept 2020

Power BI : Dynamic Page Navigation

Hello Folks!!

Few day back, I was working with one of Power BI Report on which I have worked on few months back that consists of 60 + pages excluding Overview and Feedback page.

For me, requirement came as Change Request where I need to do few very nominal changes in all the 60 + pages in the report, while working on report, I realised it is very cumbersome and tedious to scroll report pages one by one, and if you have really bad day, sometime it will scroll more number of pages at once then required and sometime even after clicks, it does not scrolled.

After scrolling about 20 odd pages, I literally gave up and found it is very difficult, boring and squeezing all my enthusiasm toward work to scroll than doing actual changes that are required in the report, so I have decided to get rid of this issue and started exploring any other way around with the help of which I would be able to skip this kind of scrolling of pages one by one in sequence.

After exploring a while, I could not found any In-Built feature that Power BI makes available to us however I landed into some kind of workaround which eventually allows me not to scroll the pages instead select required page from the Drop Down.

OR I can say usage of Page Navigation within a Report, i.e. How to easily navigate among the pages of report specially when the number of pages are more in number and hard to scroll page by page in a report.

Let's start the Road Roller with some Illustration.


Requirement


Suppose, the requirement is to make some changes in already existing report of your organization which has about 50 pages in number.

Resolution :


One can see, the simplest of the solution is to go to the respective page and do the required changes and publish report back to the Power BI Service or shared with customer OR whichever process your organization follows, and in fact, resolution wise this is the ideal solution.

To provide solution for such type of huge report that having quite a more number of pages is very problematic to the developers, not in terms of technical implementation but performing monotonous activity such as scrolling of pages again and again toward left and right direction, in other words, it makes life very difficult for developers to implement solution which is technically easy but requires tedious monotonous efforts and no one understood the pain.

To explore more on the concern, let's say changes required on say Page number -1 and Page number - 35, so in order to move from Page number - 1 to Page number - 35 , developer needs to scroll all the pages ranging from Page number - 1 to Page number - 35 one by one in sequence.

Other concern could be when developer needs to analyse the data of different pages, scrolling of pages will make very furious and irritating, i.e. it became very annoying to navigate pages again and again specially when your Day-In and Day-Out work is data analysis that is based on report pages.

While considering aforementioned cumbersome task, I eventually landed into usage of Dynamic Page Navigation approach which up to some extent will provide relief to the developer or at least allows developers to navigate among the pages without scrolling pages one by one in sequence.

So why to wait, Let's start development in step by step fashion as detailed below

Step 1 : Open Power BI Desktop

Step 2 : Open Power BI report and click Enter Data.

Step 3 : Create table columns named Page.

Step 4 : Enter names of all the pages of report one by one under column Page.

Step 5 : Provide name of the table as PageNavigation.

Step 6 : Click on Close And Apply, this will create new table named as PageNavigation manually.

* All the steps that required to create Manual Table is detailed in my another Post named Power BI : Manual Enter and Edit Data

Step 7 : Go to Visualization in Report Canvas, and select SLICER.

Step 8 : Under SLICER, select table PageNavigation as a data source for the slicer.

Step 9 : Change the Type of Slicers to Drop Down.

* Till here, slicer (drop down) with all the name of the Pages of the report are created.

Step 10 : Add any Image to the Report Canvas near to SLICER (Drop Down), I have taken arrow sign image as shown in image below in the page.

Step 11 : Select Image and Go to the ACTION

Step 12 : under Type, select Page Navigation (this is not the name of the page, instead this is functionality of Power BI Report)

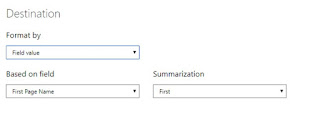
Step 13 : Under Destination, Click on fx and provide value as below
                - Format By : Field Value
                - Based on Field : First Page Name
                - SummarizationFirst

Step 14 : On Based on Field, please Go to PageNavigation and then select Page.

               * Overall setting are shown as below

                         Go to the Action.

                          Type  Select Page Navigation. 

                          Destination : Click on fx and provide value as shown below.


                         On Based on Field : Go to PageNavigation -> Page

* Now, implementation of both Slicer (dropdown) and Image are completed, now next step would be  to group both of them

Step 15 : Select slicer (Drop down) and Image together and right click and Group them together and this will create a Dynamic Page Navigator

Step 16 : Paste this grouped object in all the pages of the report (agreed this is time taking task, but good part is that, it is just a one time activity, so we can leverage it).

Step 17 : Eventually, Dynamic Page Navigator will look like below image


* Now, in order to navigate among the pages, one has to just select name of the page from the drop down and click on Image, that will lead you to the corresponding Page.

Cautions :

On entering name of the Pages in manual table, be very sure that the name you entering into the table must be same as actual name of the Page else navigation won't work for wrong name.

Pros :

This will ease the life of the developer and help them to navigate among the pages without scrolling each and every page of the report.


Cons :

It will increase the development efforts and even a small mistake in writing name of the pages will lead to the failure of the implementation for that very page


Author - Feel free to ask query if you have any.

18 Sept 2020

Power BI : Manual Enter and Edit Data

Hello Folks!!

I was just working with Power BI Desktop another day and was wondering how to create a table on which I can create schema of the table as well as enter the data at my will, and eventually found a very interesting way of creating table at Power BI desktop report level which allows developer to enter the data manually, and it also allows developer to even edit the earlier entered data with equal ease.

Though, this is one of the functionality already available for Power BI Desktop developer however it is bit tricky to find where to do the needful changes which will deliver desired output.

So in nutshell, I would call it as "Creation of manual dataset or Table for Power BI Desktop Report".

No doubt, it is quite basic to deal with, however very important feature of Power BI Desktop to explore on.

Let's start the road roller with some illustration.

Requirement : 

Suppose, requirement is to create some Power BI report for sales data of say ABC organization, there they need to have numerous kind of bar chart, line graph , Tablix etc. however they are maintaining only country ID in their data and they do not have any source data for country with respect to id which they can provide as a data set, so customer asked you to create one manual table and insert mapping of country with id (Client will help while proving information) but at the same time they do not want to place this country data at any public or private location such as FTP, SFTP location etc. so basically they want country data will be abstracted to the world and will not be available at any public and private platform so that world will not interact with the same.

Resolution : 

For a moment, let's assume there is no restriction in placing file at any public and private platform and client is fine if their data is available to the world.

In such a scenario, life will be easy and this feet can be achieved either by placing a file (csv, excel, flat file, xml etc.) that having corresponding country data at say Share Point or One Drive location OR create a table in the database with required schema and manually insert the data into the same, and then onward, it will be referred by Power BI and eventually used in the Power BI Report.

Yeah, above will work if we do not have to maintain the data abstraction, it can achieve the purpose of both Data Integrity and data Security but it needs attention and requires additional resources and human efforts to maintain the other platform where we can place these files, it could be Share Point or One Drive but both or any needs maintenance of whatever the platform was chosen for placing file.

So obviously, above objective can be achieved via aforementioned way but with few exceptions to deal with which can be proved dud for the client.

I have explored more on Power BI and found a well-defined way of achieving our objective which is demonstrated below in detail.

Power BI Dataset or Table creation with manual data Entry

Let's say we have report names SALES where we need to introduce new table that we are going to create manually, we will do the activity via several steps, please go through with one by one.

Step 1 : Open Power BI Desktop

Step 2 : Open Power BI Desktop Report named SALES

Step 3 : Navigate ribbon available at the top and Click on Home (by default Home will get open, if in case it is not, please follow what mentioned in this step)

Step 4 : Navigate to Enter Data and Click on Enter Data as shown in the image below


Step 5 : Once Enter Data was clicked, pop up will get open and guide you to create table manually.

Step 6 : Based on the requirement, please create table columns named as Country Name and Country ID and provide name to the table at the bottom of the page, let's say  Country.

Step 7 : Navigate to the Left Top corner of the page, you will find three option to close the page, out of many select Close and Apply and click on the same, as soon as Close and Apply was clicked, new table or dataset with name Country will be created and very much available to that respective SALES report.

Power BI Manual Dataset OR Table Data Editing

Power BI also provided the way to EDIT the data which we have entered manually previously, and that's obvious to have this functionality as this is quite essential and in demand as well i.e. developer needs to update the provided data or even insert the new records as days in future.

Nonetheless, at one hand, it is quite easy and straight forward task to create table manually and then insert data into it however editing of already entered data is not that straight forward, work around is very much there but it is quite hidden contrast to Data entry option.

After exploring a bit, I eventually found the way of how to achieve the goal and same has been detailed below.

Step 1 : Open Power BI Desktop

Step 2 : Open Power BI Desktop Report named SALES

Step 3 : Navigate Right side of the page and you find dataset/table named Country.

Step 4 : Right Click Country and click on EDIT

Step 5 : New page will get open, on the right, you will find Query Setting tab.

Step 6 : Under Query Setting, there is Applied Steps

Step 7 : Under Applied Steps, click gear against Source as shown in the image below


Step 8 : Now, Same Create Table screen will get opened (where data was entered manually earlier), and now this will allow to EDIT the data as well.

So while following above steps one can easily create manual tables, can enter data manually and most importantly, can edit the entered data as well.

As rule of thumb everything in this world having pros and cons, this is also not exception, please check below for the same.

Pros : 

1. Extra resource or efforts not required to maintain a standalone.

2. No such limitation in number of such table creation.

3. Fast in data processing.

Cons : 

1. Aforementioned created table "Country" will only be used inside the report SALES, i.e. it scope of usage is inside the specific report only in which it was created, it is not possible to share this dataset / table with other report even in the same workspace, its scope is limited to its report only.

2. No way to update or insert record automatically, need to do it manually.

Author - Feel free to ask query if you have any

3 Jun 2017

SQL Server Reporting Services : Migration of reports between Report Manager

Hello Folks !!

This post is another extension of the previous post SQL Server Reporting Service : Multiple reports deletion from Report Manager at One Go, previous post detailed out how to remove multiple reports from the Report Manager using RSS file which subsequently using VB-Script, in this very much post I will explore on how to migrate all the reports or number of reports from one server to another or even on multiple server.

Again, the basic understanding why such requirement ever exists is just because now a days, organization suppose to upgrade their environment to meet the trending pace of Today's world in terms of technology, one such example is when organization decided to move from SQL Server 2012 to say SQL server 2019, in such a scenario, they supposed to move their subsequent reports those are residing in SQL Server 2012 Report Manager to SQL Server 2019 Report Manager, hence need of migration comes into light, again if one has to do it manually, it will be very monotonous, frustrating, time taking , tedious and cumbersome task to perform, hence we again need some advanced or optimised solution that will do the job for developer without wasting so much of developer time which they can utilise in another productive and important work.

Let's explore the possibility of optimised solution for such kind of client request, let's discuss in detail.

Let's start the road roller with some illustration.

Requirement :

Let's say you are working in XYZ organization and as a process of optimisation, organization decided to move their all of their database of existing SQL server to advance or new version of SQL Server, i.e. from SQL Server 2012 to SQL Server 2019, in order to do that, one has to move all of their databases, SQL Server Integration Services (SSIS) ETL packages, Report definition language (RDL) files of SQL Server Reporting service (SSRS) and other required objects to new SQL Server, let's say, client has raised a request for you to migrate all of previous SQL version reports hosted on SQL Server 2012 Report Manager to new SQL Server 2019 Report Manager, once you have this request and post exploration you comes to know that number of report are quite high in number, along with, there are quite a good management of reports and subsequent department reports placed at subsequent folder, plus there are folders for Dataset etc, requirement is to move all of them to new server.


Resolution : 

Again, this request of client is legitimate and billable but very tedious and cumbersome in nature, and literally no one wants to indulge into such kind of activity at least willingly. 

Nonetheless, very straight and simple solution is to move all the reports from source report manager to destination report manager one by one manually, but as a matter of fact, this can be done this way but requires more human efforts and time consumption is quite high, in another words, maximum input and limited output with probability of Human errors, I would never recommended such type of human intervention to deal with one object at a time and high tendency of mistakes and errors, not even in my dreams, so question is how to achieve this tedious goal, be optimistic, we have better solution which is detailed in further in this very post.

Before, jumping into the final solution, it is really  important to understand few concepts which are helpful in undersigning the solution

What is Report Manager ?

Report Manager is nothing but a repository which is available over the internet (or cloud) on which all reports will be hosted, user who having required access can only access the reports.

What is RSS Extension File?

RSS Extension file is what we call it is rich Summary file which is saved on XML kind of format, one can write code on the same and execute it via Command Prompt (CMD).

What is BAT Extension File?

BAT Extension file is script file which is used CMD to perform certain activity.

What is VB Script ?

VB Script is kind of scripting language where we can write a code to perform certain activity, it is same as C# Script with only difference is use of different programming language.

What is Command Prompt (CMD) ?

CMD is default command-line interpreter and also known as CMD.exe

Above provided definition is at very glance, if one want to understand or explore more on these topics, please explore on Google as this topic is out of scope for this post.

Hopefully, all the basic terminology that we are going to use in this solution are self explanatory and easy to understood, lets use these and move towards our goal.

Pre-Requisite 

1 : SQL Sever 
2 : RS.exe utility must be installed
3 : Destination folder must be available (if not available, must create) at destination report manager.
4 : SSRS_Migration.RSS - This is easily available at Microsoft site, one can have it form there.

Source Detail 
Server : ReportServer1
Report Folder : TEST

Destination Detail 
Server : ReportServer2
Report Folder TEST

To do 
To move all the reports of folder TEST on Report Manager of Production Server ReportServer1 to folder TEST on Report Manager of Development Server ReportServer2

Migration of reports from one Report Manager to another

Step 1 : Open Report Manager of ReportServer2

Step 2 : Check whether folder TEST is available of not, if not, please create folder named TEST. 

Step 3 : Open Notepad

Step 4 : Click on Save As  OR HIT < CTRL + SHIFT + S >  

Step 5 : Under Save As Type , select All Files

Step 6 : Provide File Name as MigrateReport.bat and write below code
D:\>D:\SSRS\MigrateReport.bat
D:\rs.exe -i ssrs_migration.rss -e Mgmt2010 -s "ReportServer1" -v f+"/TEST" -v ts="ReportServer" -v tf="/TEST"

* Below is the snapshot for the same


* Place at same location where ssrs_migration.rss is placed (Optional though, one can place any file at any location, placing at same place require less coding while calling files from CMD 

Step 7 : Open CMD command and execute MigrateReport.bat.

Hurray !!! Here we go, we got the desired result.


Pros and Cons

Pros 
1. This will help you to migrate all the reports from one Report Manager to another. 

Cons 
1. All the shared dataset which uses credentials will not be migrate to another server.

Author - Feel free to ask query if you have any query

9 Feb 2017

SQL Server Reporting Service : Multiple reports deletion from Report Manager at One Go

Hello Folks!!

This time I comes up with one of the very interesting topic of the SQL Server Reporting Services, this will allow user to get rid of the cumbersome task of deleting reports manually and in fact save lot of time that can be utilised in other more important productive work.

Now a days, every organization are indulging into migration of their deliverables from one location to another, sometime for better technology and sometime for removing all the obsolete objects from their environment, let's suppose your organization is also following the same path and on one very good morning of your work day, you will receive request from the client to remove all unwanted or obsolete reports that they have in our very own Report Manager, sounds good and affirmative but when you explored the details of the request then you get to know that the number of reports are quite high in number however your client provided you the list of all the reports along with the path or URL of all the reports those are resides on Report Manager.

Such kind of request are actually very time consuming and if one has to go with traditional way of deleting report one by one after navigating reports over the Report Manager, it will take ages to complete the process, its not only about time, it also quite frustrating, tedious and cumbersome task to deal with.

Let's explore the possibility of optimised solution for such kind of client request, let's discuss in detail.

Let's start the road roller with some illustration.

Requirement :

Let's say you are working in Sales organization and there are numerous reports residing on Report Manager of SQL Server Reporting Services, you get a JIRA request stating to delete OR remove all the reports from the Report Manager those are obsolete or Not in use any more (they have also provided list of report along with path of all the reports in Report Manager) reason being, client really do not want to waste its time, money and resources for those reports which are useless for them and they will not use it any time in future.

Resolution : 

Though, request is no doubt is very cumbersome and no one wants to work on such activity, but some one has to perform it as it is the legitimate request and client is paying for the same.

One could be solution is to delete all the reports one by one manually but for sure it will require more time and more human efforts, in addition, doing activity manually in itself is very cumbersome and tedious task to perform, so in ideal scenario, this must not be in the list of the solution, even, if it is, it must be last thing in the world to progress with.

So, lets move towards the actual solution of the request, but I would like to explain few things before elaborating the solution as these will be key part of the solution.

What is Report Manager ?

Report Manager is nothing but a repository which is available over the internet (or cloud) on which all reports will be hosted, user who having required access can only access the reports.

What is RSS Extension File?

RSS Extension file is what we call it is rich Summary file which is saved on XML kind of format, one can write code on the same and execute it via Command Prompt (CMD).

What is VB Script ?

VB Script is kind of scripting language where we can write a code to perform certain activity, it is same as C# Script with only difference is use of different programming language.

What is Command Prompt (CMD) ?

CMD is default command-line interpreter and also known as CMD.exe

Definition provided above for the objects are at glance, if you want to have more detail on the subject you can refer them in detail over the internet.

As of now, you understood well all the basic terminology that are going to use in this very subject, lets start with the solution.

One of the handful and most useful method to delete multiple reports is to use RSS file for the deletion of reports, herein, I am detailing out all the steps that needs to perform this activity.

Delete one Report at a time

Step 1 : Open Notepad

Step 2 : Click on Save As  OR HIT < CTRL + SHIFT + S >  

Step 3 : Under Save As Type , select All Files

Step 4 : Provide File Name as TestDelete.rss

Step 5 : Write below VB - Script  inside the file  
    Public Sub Main()
        rs.DeleteItem("/Report_test/TestReport/")
    End Sub

* Below is the snapshot of the .RSS file that was created in above steps.


Step 6 : Place TestDelete.rss at any location where ever your organization has or you want.

Note - /Report_Test/TestReport : Root Folder in Report Manager, i.e. in this case, we have folder named Report_test at root on Report Manager and TestReport.rdl  is RDL file inside that folder.

Step 7 : Herein, the idea is to call TestDelete.rss from CMD (Command Prompt)Now, with the help of CMD command, we can delete above aforementioned report, please find snapshot below.


Hurray !!! Here we go, we got the desired result.

Required report got deleted from the Report Manager as soon as we have executed above CMD.

Delete multiple Reports at a time

One might thinks, aforementioned procedure can only delete one report at a time, then what is the difference between deleting everything manually one by one and using above procedure and providing report name one by one and deleting report, so Yes, you are absolutely correct, literally, they are more or less same but later will take bit less time than former however level of frustration and monotonous work will remain the same.

Just to enhance and make this procedure helpful to remove multiple report at a matter of time, we need to do little change in the VB Script and then we will be able to delete multiple reports at one go.

Below are the complete steps to perform the activity.

Step 1 : Open Notepad

Step 2 : Click on Save As  OR HIT < CTRL + SHIFT + S >  

Step 3 : Under Save As Type , select All Files

Step 4 : Provide File Name as TestDelete.rss

Step 5 : Write below VB - Script inside the file  
    Public Sub Main()
        rs.DeleteItem("/Report_test/TestReport/")
        rs.DeleteItem("/Report_test/TestReport1/")
    End Sub

Note - Just to include one more row to the VB-Script, highlighting in RED above, if you want to delete n number of rows, you need to include all the report path one by one as shown in the Step-5, as we have all list of path of complete report, so it won't be time consuming task to accumulate all the report path , may be MS- Excel will help you in gather list of path of report in quick time.

* Below is the snapshot of the .RSS file that was created in above steps       


Step 6 : Place TestDelete.rss at any location where ever your organization has or you want.

Step 7 : Herein, the idea is to call TestDelete.rss from CMD (Command Prompt)Now, with the help of CMD command, we can delete above aforementioned report, please find snapshot below.


Hurray !!! Here we go, we got the desired result.

Pros and Cons

Pros 
1. This will help you to delete multiple reports at one and consume less time.

Cons 
1. VB Script and CMD knowledge is required to perform aforementioned activity.

Author - Feel free to ask query if you have any query